
How to Deploy your Applications in Serverless with Cloud Run


Google Cloud Run is a serverless platform that effectively automates infrastructure management, enabling developers to focus on their key strength: crafting quality code. For those not entirely familiar with Docker or Google Cloud Platform (GCP), let me briefly get you up to speed.
Docker is a robust tool that streamlines the process of creating, deploying, and running applications using containers. Similarly, **GCP **is a versatile cloud computing service provided by Google, offering an array of modular services, from computing to data storage and machine learning. For a more comprehensive understanding, you might find this link useful.
Now, let's look at some key advantages of using Cloud Run:
- Efficiency: Deploy applications swiftly and hassle-free.
- Scalability: Easily adjust your application's resources to meet user demand.
- Cost-effective: Pay only for the resources you use.
Now that we are primed on the basics let's dive right into the core of our discussion on how to deploy applications on Cloud Run, with Next.js serving as our example.
Step 1: Creating a Next.js Project and Dockerizing the Application
To begin, create a new Next.js project or use an existing one. Once you have your project ready, create a Docker file and include the following code:
FROM node:18 WORKDIR /usr/src/app COPY . . RUN npm install RUN npm run build EXPOSE 8080 CMD npm start
Let's break down what each line does:
- FROM node:18: Specifies the base image to use for the container, which is Node.js version 18.
- WORKDIR /usr/src/app: Sets the working directory within the container.
- COPY. .: Copies the application files from the current directory to the working directory in the container.
- RUN npm install: Installs the application dependencies.
- RUN npm run build: Builds the Next.js application.
- EXPOSE 8080: Exposes port 8080 within the container.
- CMD npm start: Specifies the command to run when the container starts, which starts the Next.js application.
Step 2: Building and Running the Docker Container
Once we have our Docker file, we need to build the Docker image and run the container. Open your terminal and navigate to the project directory. Execute the following command to build the Docker image:
docker build -t <CONTAINER_NAME>
This command builds the Docker image using the instructions specified in the Docker file. After a successful build, run the container using the following command:
docker run -p 8080:8080 <CONTAINER_NAME>
This command maps port 8080 from the container to port 8080 on your host system, allowing you to access your application locally.
Step 3: Pushing the Docker Image to Google Container Registry (GCR)
Now that we have the containerized version of our application, it's time to push it to Google Container Registry (GCR). This will allow us to deploy it on Cloud Run.
To push the Docker image to GCR, we need to tag it appropriately. Use the following command:
docker tag [EXISTING_IMAGE_NAME] gcr.io/<PROJECT_ID>/<IMAGE_NAME>
Replace [EXISTING_IMAGE_NAME] with the name of your Docker image. Replace <PROJECT_ID> with your Google Cloud project ID and <IMAGE_NAME> with the desired name for your image.
Next, push the image to GCR using the command:
docker push gcr.io/<PROJECT_ID>/<IMAGE_NAME>
This command uploads the Docker image to GCR, making it accessible for deployment.
After successful pushing, log in to your Google Cloud console and navigate to the Container Registry section. You should see your pushed image listed. You can also use cloud build. Which enables automated building and pushing of Docker images to GCR.

Step 4: Deploying the Image on Cloud Run
Navigate to the Cloud Run section in the Google Cloud console. Click on "Create Service" and select the container image from the Container Registry. Provide a name for your service.
In the authentication section, select "Allow unauthenticated invocations" if your application will be publicly accessible.
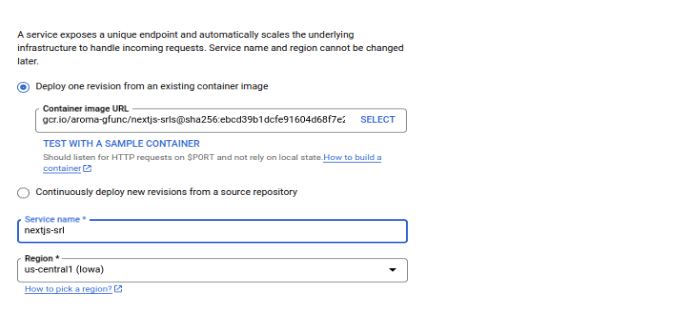
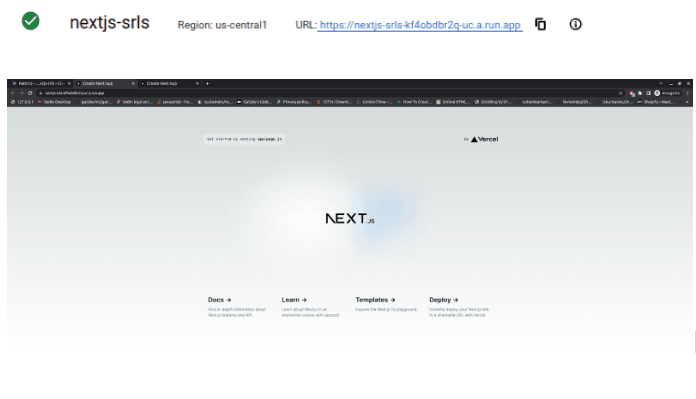
Finally, click on "Create" to deploy your application and then open the URL provided to access your app.
Potential challenges
While deploying applications in a serverless environment like Cloud Run is mainly efficient, you might still encounter some hiccups. Google's comprehensive Cloud Run documentation is an excellent resource for an in-depth look at potential challenges - such as cold starts, debugging, and migration - and how to navigate them.
Forums like Stack Overflow and GitHub can also provide valuable insights from fellow developers. As with any technology, overcoming these hurdles involves understanding, continuous learning, and consistent practice. So embrace the challenges and keep exploring.
And that’s all, folks.
Adopting serverless with Cloud Run equates to efficient cost savings and a simplified operational model. It's suitable for diverse applications as long as they are stateless. With Cloud Run, developers can concentrate on coding, leaving the operations to the platform. Get started with serverless deployments today and experience streamlined scalability and simplicity. Dive in and innovate!
Related Articles


4 Shopify Winter ‘23 Checkout Updates That Can Change The Game For Your Online Store


Server-Side Rendering Vs Client-Side Rendering: All Webpage Rendering Methods Explained


The 3 Big Trends Driving B2B Commerce in 2024


Shopify Winter ’25 Updates: Decoded for Merchants' Success